Learning Ada - install the compiler and development environment on Windows

Learning Ada - install the compiler and development environment on Windows

12th January 2024 by Admin

I am about to embark on learning the programming language Ada Smile 

Of course you need to guides, tutorials and other learning material to get you going. Amongst the stuff I am looking at right now are:

Pretty soon you want to be able to test your Ada-skills, and while you can use any text editor wringing your Ada programs, you will at least need an Ada-compiler.

However, you would probably like to have a full Ada-environment, consisting of a compiler, a package manager and finally Integrated Development Environment (IDE). In Ada these tools can be GNAT and GPRBUILD and GNAT Studio.

The tools can be installed in any order, but I have seen that by installing the tools in the following order, the last IDE install may nicely pick up the whereabouts of the previous tools.

Before we continue, be sure to have approximately 2.5 GB of free space on your hard disk. Below you see my compiler (gnat), build system (gprbuild) and IDE (gps) and their respective use of hard disk space:

Directory sizes

Next we install tool by tool!

First – the GNAT compiler

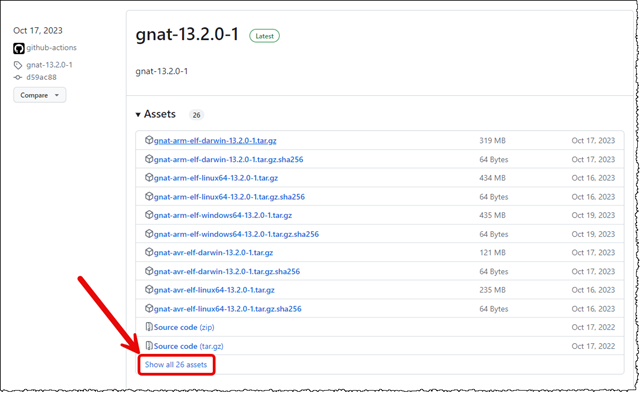
Go to the repository at https://github.com/alire-project/GNAT-FSF-builds/releases and look for the “gnat-XX.x.y-”, such as for example gnat-13.2.0-1. Below you see the project as first seen:

Where to locate the gnat-package for Windows

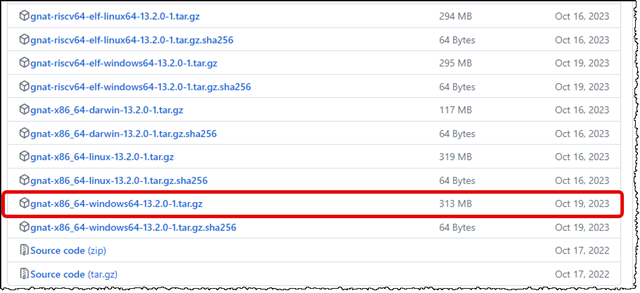
Since Gnat can be installed on a bunch of different platforms and processors, you need to click on the Show all 26 assets as marked in the screen shot above. You are looking for the following: gnat-x86_64-windows64-13.2.0-1.tar.gz – You guessed it – the naming format is mixing in the version number according to the gnat-version you want to download Smile

Found the gnat package for Windows

You can download this file, and soon we will unpack it (the .gz file denotes a gzipped file, pretty similar to an ordinary zip file).

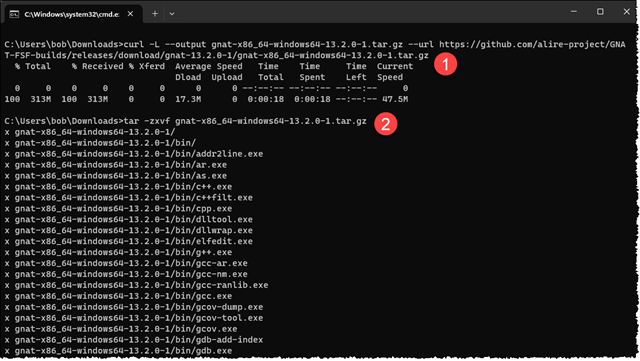
If you have a newer version of Windows (Windows 10, starting from Insider Build 17063), you might even use the classic tools curl and tar to download and unpack the .gz file above :

curl -L --output gnat-x86_64-windows64-13.2.0-1.tar.gz --url https://github.com/alire-project/GNAT-FSF-builds/releases/download/gnat-13.2.0-1/gnat-x86_64-windows64-13.2.0-1.tar.gz

tar -zxvf gnat-x86_64-windows64-13.2.0-1.tar.gz

First paste the curl-command to the Command Prompt, and let that download the package. This is marked by 1 in the screen shot below. Second paste the tar-command, as marked by 2 below:

Results from curl and tar in a Command Prompt

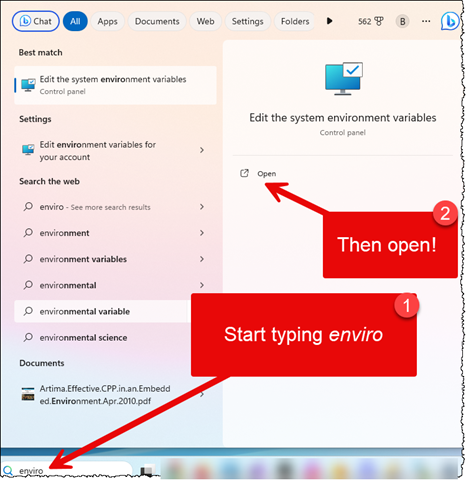
After successful download and unpacking, you will have a directory named gnat-x86_64-windows64-13.2.0-1 in your current folder. Inside that you will find another folder with the same name. This can be placed anywhere you like on your machine, and we will reference its bin-directory in the system Path environment variable later. I move this folder to my D:Programsgnat-folder. This means that I will need to add the D:Programsgnatbin to my PATH environment variable like this in Windows 11.

How to change environment variables, step 1

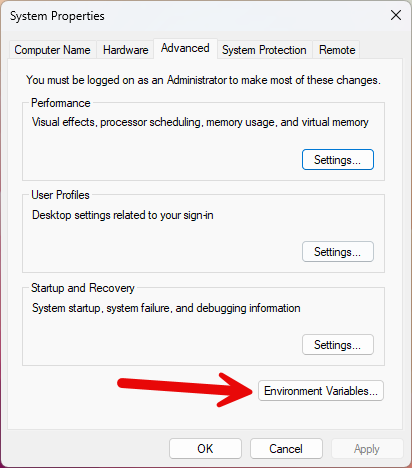
When the System Properties dialog box appears, click the Environment Variables-button, as shown below;

How to change environment variables from System Properties

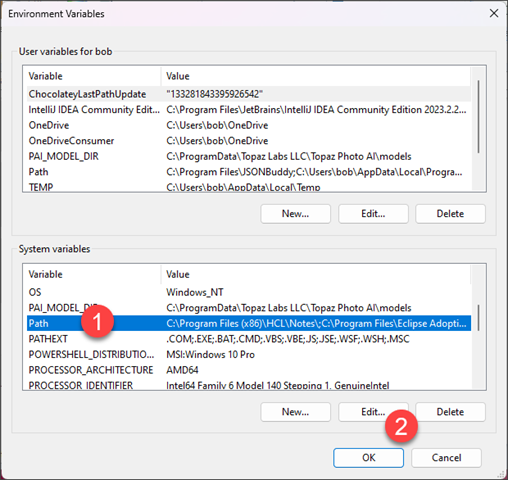
The next dialog box Environment Variables should pop up. In the System Variables, locate the Path-variable as marked by 1 in the screen shot below.

Locate the correct Path-environment variable

Select the Path-variable line, and click the Edit-button as shown above. The next dialog box will be Edit environment variable as shown below;

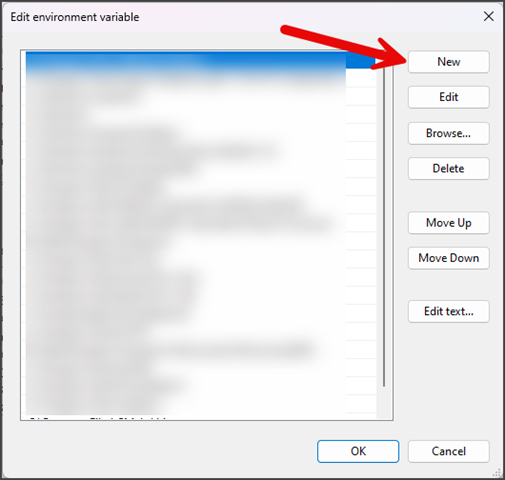
How to add a new path to the list of paths

I have blurred my other paths on purpose. You click the New-button. This will add a new line in the (blurred) list box above, allowing you to type in the path to the bin directory of your gnat-directory. In my case this is D:Programsgnatbin. You can also use the Browse-button to locate the directory.

To save your choice, click OK on this dialog box and all the preceding dialog boxes.

Important about the sequence of paths

You might notice that the GNAT-path was added as the very last path in the list of paths? You may change that, if you experience trouble later. Why is this? The position of your path in the list of paths do matter. Windows will look for applications and files in the sequence that you have specified. Say you open up a Command Prompt, and want to use the application gcc.exe (which happen to be the GNAT compiler). Windows will first look in the first directory listed in your Path variables list, and if not found, continue to the next path. This will continue until Windows finds gcc.exe in the paths list. Now, imagine that some other tool for some reason also have a gcc.exe program. Windows will now use this instead of put intentional GNAT compiler gcc.exe! Therefore, you might want to return to the environment variables dialog later to move the GNAT bin-path up in the list of paths.

You might test if it works too

One thing to remember about paths is that they first come to play after you have saved the changes as described above, and that you have restarted any application using the paths. In order to check if gcc.exe actually is working as planned, is to start a new Command Prompt, to pick up the path-changes, and type … (marked by 1):

gcc –version

The result looks like this if everything is OK:

Result from gcc --version in a Command Prompt

Second, we want the build system GPRBUILD.EXE

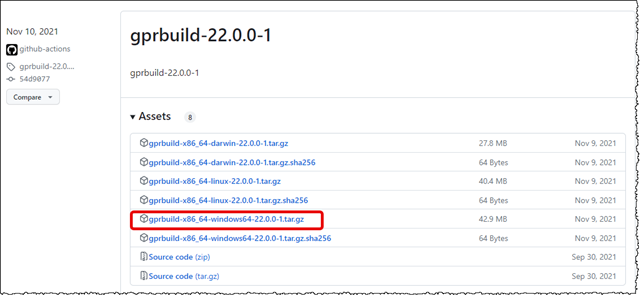
On the same page as you found your gnat-version (https://github.com/alire-project/GNAT-FSF-builds/releases), you should find the latest gprbuild-XX.y.x-z project, like this:

How tro locate the gprbuild-package for Windows

Locate the gprbuild-x86_64-windows64-22.0.0-1.tar.gz file. This should be downloaded, unpacked, and placed in the same manner as for the GNAT-compiler in the previous section.

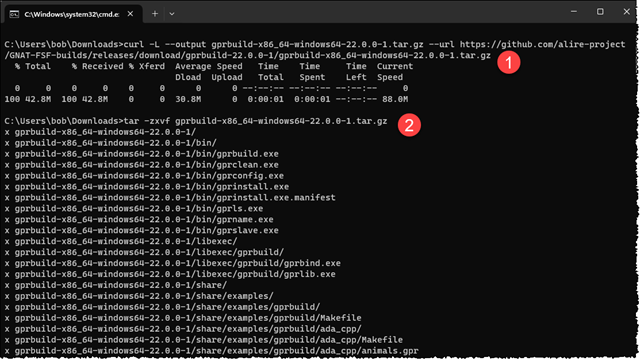
The Command Prompt-variant using curl and tar looks like this:

curl -L --output gprbuild-x86_64-windows64-22.0.0-1.tar.gz --url https://github.com/alire-project/GNAT-FSF-builds/releases/download/gprbuild-22.0.0-1/gprbuild-x86_64-windows64-22.0.0-1.tar.gz

tar -zxvf gprbuild-x86_64-windows64-22.0.0-1.tar.gz

Successful output looks like this:

Result from curl and tar on gprbuild in a Command Prompt

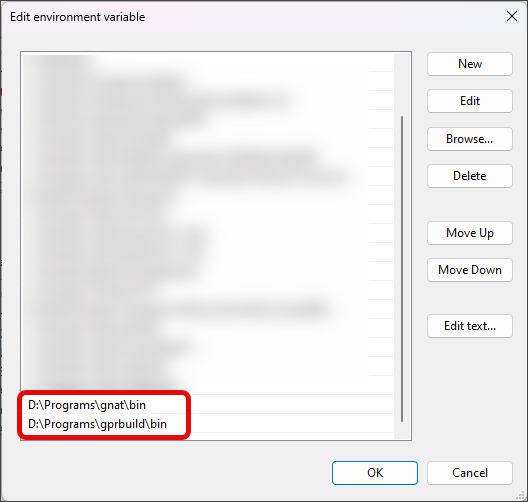
I move the content of the unpacked folder to my D:Programsgprbuild-directory, and just as I did with the GNAT-compiler, I add the bin-directory to the environment variables. My Path-variable now contains both the D:Programsgnatbin- and D:Programsgprbuildbin paths, like this:

Both gnat and gprbuild-paths added to list of paths

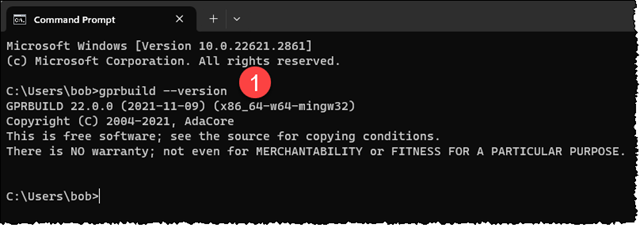
Below you see the result after I have opened up a new Command Prompt and  typed gprbuild –version:

Result of gprbuild --version in a Command Prompt

If you feel uncertain whether the new paths really has been loaded or not, it is time to reboot.

Finally, install the Integration Development Environment GNAT Studio

You find the GNAT Studio downloads here: https://github.com/AdaCore/gnatstudio/releases

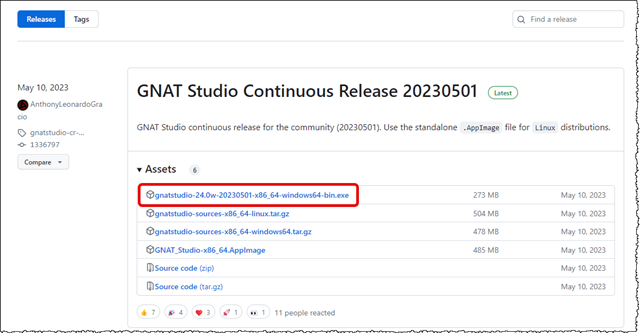
Locate the latest Windows build, like for example gnatstudio-24.0w-20230501-x86_64-windows64-bin.exe as shown below:

How to locate the GNAT Studio package for Windows

Before you download it, plan ahead where you want the gps-directory (gps=GNAT Programming Studio). As you have seen in the previous sections, I have placed my Ada-tools in the D:Programs-directory. I choose to follow this pattern here too, so my upcoming GNAT Studio will be placed in the D:Programsgps (and thus all bin files will be in D:Programsgpsbin).

Now, download and Run as Administrator if you want to install it for all users, or just launch it to install it for just your user.

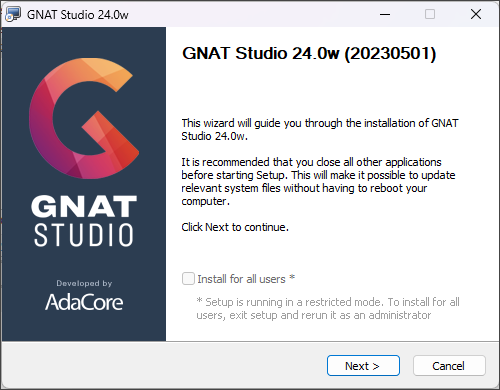
Below you see the first dialog box from the installer when I have launched it without Run as Administrator privileges.

GNAT Studio Install Wizard - step 1

FYI – I did launch the installer with Run as Administrator for the next screens!

Click Next

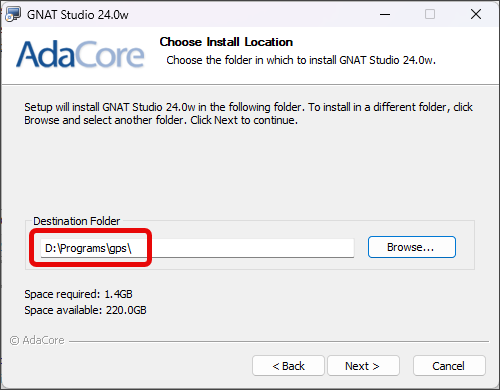
Choose the whereabouts of GNAT Studio

Ensure your specify your intended directory, here D:Programsgps … Click Next ….

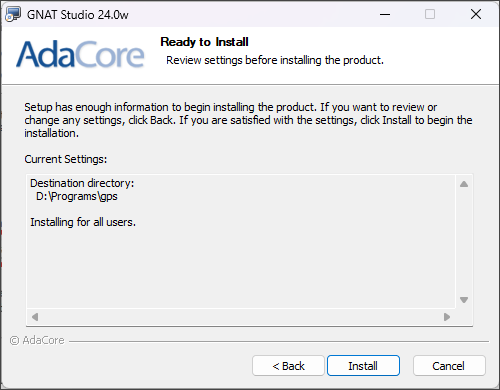
A summary of the installation, and click Install

Just before install commences

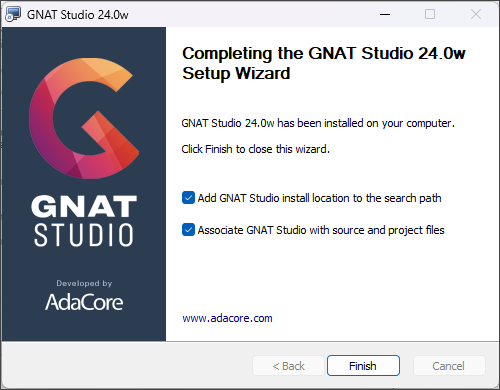
The installation commences, and finally you will see the following dialog box:

Final step in GNAT Studio Install Wizard

Accept the suggested settings and click Finish.

Now, open a new Command Prompt and typs gnatstudio_cli –version. The result should look like this:

Result from gnatstudio_cli --version in a Command Prompt

Now you have the compiler (GCC) in place, the build system (GPRBUILD) and the GNAT Studio in place. It should now be possible to create and build Ada programs!

Take the GNAT Studio for a spin!

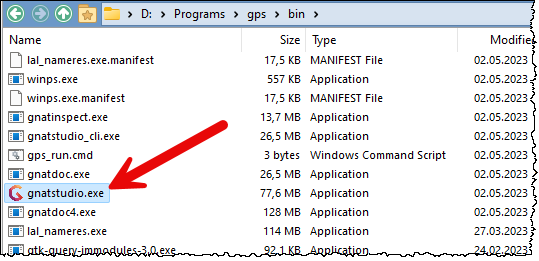
The GNAT Studio installer do not offer to place an icon on your Windows desktop, so you have to use the Windows Explorer to navigate to your gpsbin, directory. In my case that means D:Programsgpsbin. Locate the file gnatstudio.exe and double-click to launch.

Location of gnatstudio.exe in Explorer

If everything is installed OK, you should see the splash screen like the one below:

GNAT Studio Splash screen

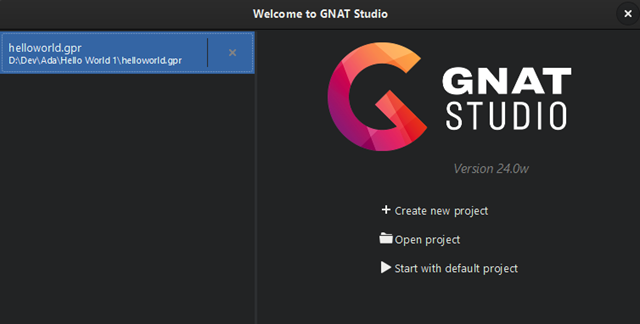
Just like other IDEs, such as Visual Studio and Jetbrains IntelliJ, PyCharm and many more, you will soon see a little dashboard like…

Welcome screen in GNAT Studio

You see that I have already created a small Hello World-project located in my source code directory D:DevAda and the separate subfolder Hello World 1.

When you start GNAT Studio for the very first time, it will ask you a series of questions. Amongst the first, is where you want to place your project. At present time, I like to have them in separate directories, but that might change if it smart to do otherwise later. Smile

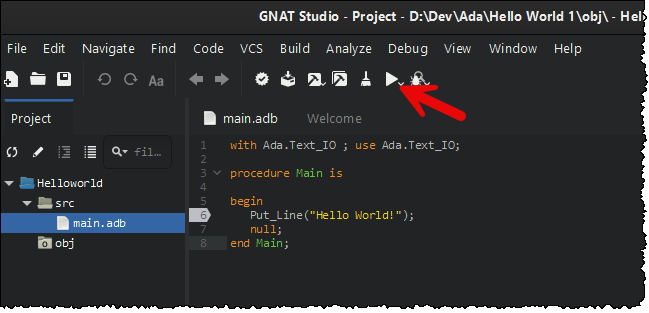
Below you see my first Hello World code in Ada in GNAT Studio:

First Hello World program in GNAT Studio

Click on the Play-button to build and run your code. Below you see the result:

And it works!

Jiiha! Ada – here I come!

PS! Here is my simple Ada code above:

with Ada.Text_IO ; use Ada.Text_IO;

procedure Main is

begin
   Put_Line("Hello World!");
   null;
end Main;


Login to post a comment

Learning Ada - install the compiler and development environment on Windows

Learning Ada - install the compiler and development environment on Windows

12th January 2024 by Admin

I am about to embark on learning the programming language Ada Smile 

Of course you need to guides, tutorials and other learning material to get you going. Amongst the stuff I am looking at right now are:

Pretty soon you want to be able to test your Ada-skills, and while you can use any text editor wringing your Ada programs, you will at least need an Ada-compiler.

However, you would probably like to have a full Ada-environment, consisting of a compiler, a package manager and finally Integrated Development Environment (IDE). In Ada these tools can be GNAT and GPRBUILD and GNAT Studio.

The tools can be installed in any order, but I have seen that by installing the tools in the following order, the last IDE install may nicely pick up the whereabouts of the previous tools.

Before we continue, be sure to have approximately 2.5 GB of free space on your hard disk. Below you see my compiler (gnat), build system (gprbuild) and IDE (gps) and their respective use of hard disk space:

Directory sizes

Next we install tool by tool!

First – the GNAT compiler

Go to the repository at https://github.com/alire-project/GNAT-FSF-builds/releases and look for the “gnat-XX.x.y-”, such as for example gnat-13.2.0-1. Below you see the project as first seen:

Where to locate the gnat-package for Windows

Since Gnat can be installed on a bunch of different platforms and processors, you need to click on the Show all 26 assets as marked in the screen shot above. You are looking for the following: gnat-x86_64-windows64-13.2.0-1.tar.gz – You guessed it – the naming format is mixing in the version number according to the gnat-version you want to download Smile

Found the gnat package for Windows

You can download this file, and soon we will unpack it (the .gz file denotes a gzipped file, pretty similar to an ordinary zip file).

If you have a newer version of Windows (Windows 10, starting from Insider Build 17063), you might even use the classic tools curl and tar to download and unpack the .gz file above :

curl -L --output gnat-x86_64-windows64-13.2.0-1.tar.gz --url https://github.com/alire-project/GNAT-FSF-builds/releases/download/gnat-13.2.0-1/gnat-x86_64-windows64-13.2.0-1.tar.gz

tar -zxvf gnat-x86_64-windows64-13.2.0-1.tar.gz

First paste the curl-command to the Command Prompt, and let that download the package. This is marked by 1 in the screen shot below. Second paste the tar-command, as marked by 2 below:

Results from curl and tar in a Command Prompt

After successful download and unpacking, you will have a directory named gnat-x86_64-windows64-13.2.0-1 in your current folder. Inside that you will find another folder with the same name. This can be placed anywhere you like on your machine, and we will reference its bin-directory in the system Path environment variable later. I move this folder to my D:Programsgnat-folder. This means that I will need to add the D:Programsgnatbin to my PATH environment variable like this in Windows 11.

How to change environment variables, step 1

When the System Properties dialog box appears, click the Environment Variables-button, as shown below;

How to change environment variables from System Properties

The next dialog box Environment Variables should pop up. In the System Variables, locate the Path-variable as marked by 1 in the screen shot below.

Locate the correct Path-environment variable

Select the Path-variable line, and click the Edit-button as shown above. The next dialog box will be Edit environment variable as shown below;

How to add a new path to the list of paths

I have blurred my other paths on purpose. You click the New-button. This will add a new line in the (blurred) list box above, allowing you to type in the path to the bin directory of your gnat-directory. In my case this is D:Programsgnatbin. You can also use the Browse-button to locate the directory.

To save your choice, click OK on this dialog box and all the preceding dialog boxes.

Important about the sequence of paths

You might notice that the GNAT-path was added as the very last path in the list of paths? You may change that, if you experience trouble later. Why is this? The position of your path in the list of paths do matter. Windows will look for applications and files in the sequence that you have specified. Say you open up a Command Prompt, and want to use the application gcc.exe (which happen to be the GNAT compiler). Windows will first look in the first directory listed in your Path variables list, and if not found, continue to the next path. This will continue until Windows finds gcc.exe in the paths list. Now, imagine that some other tool for some reason also have a gcc.exe program. Windows will now use this instead of put intentional GNAT compiler gcc.exe! Therefore, you might want to return to the environment variables dialog later to move the GNAT bin-path up in the list of paths.

You might test if it works too

One thing to remember about paths is that they first come to play after you have saved the changes as described above, and that you have restarted any application using the paths. In order to check if gcc.exe actually is working as planned, is to start a new Command Prompt, to pick up the path-changes, and type … (marked by 1):

gcc –version

The result looks like this if everything is OK:

Result from gcc --version in a Command Prompt

Second, we want the build system GPRBUILD.EXE

On the same page as you found your gnat-version (https://github.com/alire-project/GNAT-FSF-builds/releases), you should find the latest gprbuild-XX.y.x-z project, like this:

How tro locate the gprbuild-package for Windows

Locate the gprbuild-x86_64-windows64-22.0.0-1.tar.gz file. This should be downloaded, unpacked, and placed in the same manner as for the GNAT-compiler in the previous section.

The Command Prompt-variant using curl and tar looks like this:

curl -L --output gprbuild-x86_64-windows64-22.0.0-1.tar.gz --url https://github.com/alire-project/GNAT-FSF-builds/releases/download/gprbuild-22.0.0-1/gprbuild-x86_64-windows64-22.0.0-1.tar.gz

tar -zxvf gprbuild-x86_64-windows64-22.0.0-1.tar.gz

Successful output looks like this:

Result from curl and tar on gprbuild in a Command Prompt

I move the content of the unpacked folder to my D:Programsgprbuild-directory, and just as I did with the GNAT-compiler, I add the bin-directory to the environment variables. My Path-variable now contains both the D:Programsgnatbin- and D:Programsgprbuildbin paths, like this:

Both gnat and gprbuild-paths added to list of paths

Below you see the result after I have opened up a new Command Prompt and  typed gprbuild –version:

Result of gprbuild --version in a Command Prompt

If you feel uncertain whether the new paths really has been loaded or not, it is time to reboot.

Finally, install the Integration Development Environment GNAT Studio

You find the GNAT Studio downloads here: https://github.com/AdaCore/gnatstudio/releases

Locate the latest Windows build, like for example gnatstudio-24.0w-20230501-x86_64-windows64-bin.exe as shown below:

How to locate the GNAT Studio package for Windows

Before you download it, plan ahead where you want the gps-directory (gps=GNAT Programming Studio). As you have seen in the previous sections, I have placed my Ada-tools in the D:Programs-directory. I choose to follow this pattern here too, so my upcoming GNAT Studio will be placed in the D:Programsgps (and thus all bin files will be in D:Programsgpsbin).

Now, download and Run as Administrator if you want to install it for all users, or just launch it to install it for just your user.

Below you see the first dialog box from the installer when I have launched it without Run as Administrator privileges.

GNAT Studio Install Wizard - step 1

FYI – I did launch the installer with Run as Administrator for the next screens!

Click Next

Choose the whereabouts of GNAT Studio

Ensure your specify your intended directory, here D:Programsgps … Click Next ….

A summary of the installation, and click Install

Just before install commences

The installation commences, and finally you will see the following dialog box:

Final step in GNAT Studio Install Wizard

Accept the suggested settings and click Finish.

Now, open a new Command Prompt and typs gnatstudio_cli –version. The result should look like this:

Result from gnatstudio_cli --version in a Command Prompt

Now you have the compiler (GCC) in place, the build system (GPRBUILD) and the GNAT Studio in place. It should now be possible to create and build Ada programs!

Take the GNAT Studio for a spin!

The GNAT Studio installer do not offer to place an icon on your Windows desktop, so you have to use the Windows Explorer to navigate to your gpsbin, directory. In my case that means D:Programsgpsbin. Locate the file gnatstudio.exe and double-click to launch.

Location of gnatstudio.exe in Explorer

If everything is installed OK, you should see the splash screen like the one below:

GNAT Studio Splash screen

Just like other IDEs, such as Visual Studio and Jetbrains IntelliJ, PyCharm and many more, you will soon see a little dashboard like…

Welcome screen in GNAT Studio

You see that I have already created a small Hello World-project located in my source code directory D:DevAda and the separate subfolder Hello World 1.

When you start GNAT Studio for the very first time, it will ask you a series of questions. Amongst the first, is where you want to place your project. At present time, I like to have them in separate directories, but that might change if it smart to do otherwise later. Smile

Below you see my first Hello World code in Ada in GNAT Studio:

First Hello World program in GNAT Studio

Click on the Play-button to build and run your code. Below you see the result:

And it works!

Jiiha! Ada – here I come!

PS! Here is my simple Ada code above:

with Ada.Text_IO ; use Ada.Text_IO;

procedure Main is

begin
   Put_Line("Hello World!");
   null;
end Main;


Login to post a comment